A question that I am frequently asked is how I carry my camera gear when travelling by plane. With all of the delays, missed connections, and damaged, stolen, or lost luggage these days, it can be quite stressful getting to your destination even if you don’t check any baggage.
The solution that has worked for me is coming up with a “travel kit” of gear that takes up very little space and will cover 99% of anything I ever want or need to shoot. I pack that gear into an “Airport Addicted” backpack made by Thinktank Photo along with most of my clothing. The airport addicted bag was designed to hold the maximum amount of gear possible while still meeting most airline carry-on restrictions. You would be amazed at what I can stuff in this bag and along with my expedition 5 backpack (loaded with the rest of my clothes) carried on as my one “personal item”, I can fit everything I need for a 5 day trip without having to check a single piece of luggage.
When I arrive at my destination, I simply move all the camera gear into my smaller backpack and move all of my clothes into the large one until I’m ready to head back to the airport.
The only down side to this is that the bag can get quite heavy, usually around 40 pounds fully packed, when you have a long way to walk! They have since come out with a “roller” version of this bag and if I traveled a lot more, I would seriously consider getting one.
Now that I’ve covered how I get my gear from here to there, I’ll share what I take and why I feel it’s such a good balance of function and space savings.
99% of what I shoot is between 17-200mm focal length. This includes macro work but a dedicated macro lens is fairly limited so I choose to carry a set of extension tubes to use with my 70-200mm lens. Throw in a 2X tele-converter and that one lens lets me shoot from extreme close-ups all the way out to 400mm. (That in itself is the most practical combination in my line-up.) I then bring a 17-40mm, and a 28-70mm and that’s it! They all share the same filter diameter which cuts down on accessories needed as well. My tripod, with the ballhead removed, attaches to the outside of the bag, my flash cards, spare batteries, and assorted filters are all tucked away in separate zippered compartments inside.
Here are some images of this set-up I quickly shot today while packing for my upcoming workshop in Maine with Kathleen Clemons. We will be driving the coastline of Maine for 4 days, shooting everything from lighthouses to lobsters, and I know that I have all the gear I need for anything that we find along the way.
Ron Goldman
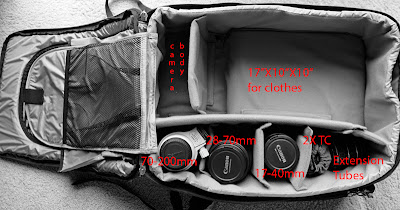
As you can see, there is plenty of room left for clothes in the main compartment, and there is a laptop compartment on the reverse side as well.
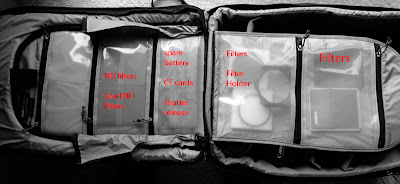
All of my accessories fit nicely in the top flap compartments.
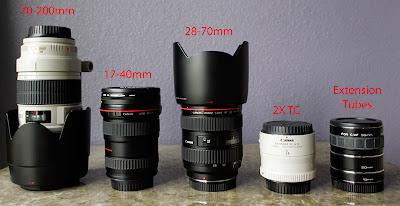
My "travel kit". Small, lightweight, and very functional.
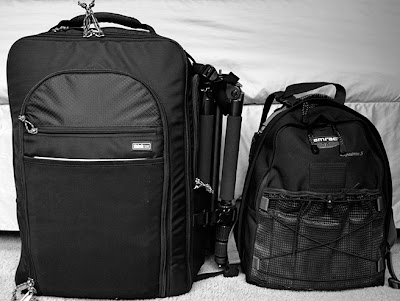
Both bags packed and ready to go. My small travel tripod is attached and the ballhead is safely stored away inside.
Sunday, September 30, 2007
Wednesday, September 5, 2007
The Great Power of NO Color
by Danilo Piccioni
When thinking of black and white photography, the worst thing one could think is that B&W is a photograph without any color. It would be just as bad as thinking that a color image is a B&W photograph infested with colors. There are sixteen million shades of gray in the B&W world; trust me when I say that's a lot. There is no reason to think that a B&W picture is in any way inferior to a color one.
Typically a non-digital B&W shooter would use a colored filter attached to the camera; the filter allows the photographer to see the scene in B&W through the viewfinder so that he can decide how to shoot reality at its best using a different-color filter, e.g. yellow, red, green.
Today’s mid-range digital cameras have the option of shooting directly in BW or in color.
Now you just shoot and then decide later, and if you want, you can have them both.
If you are serious about B&W photography, you want to capture your exposures in color first, then convert it into B&W later in your Photoshop darkroom.
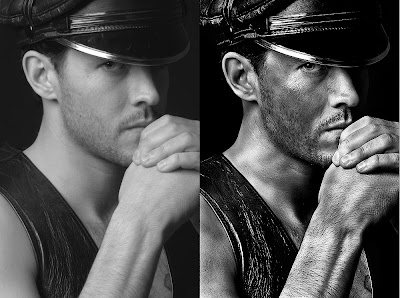
There are many different ways to create a B&W photograph in PS from a color shot. The worst thing you could do to your photograph is to chose the one-click method, to convert the color photo to grayscale.
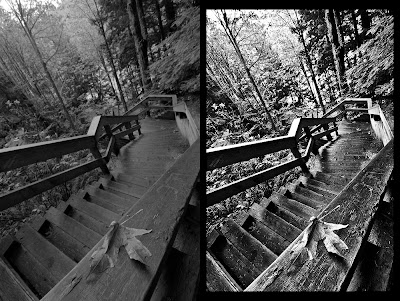
These sample photographs show you the difference between a photograph that was converted with this automatic PS feature and the versions achieved by working with other methods in PS.
This and other tricks and techniques will be explained in full detail in my B&W course here and only here at Perfect Picture School of Photography.
Danilo Piccioni © 2007
Calla Addiction
Many of you already know that I have a calla lily addiction, I love them! They are my favorite flower to photograph, I find their lines and curves fascinating and so elegant. When you have a favorite subject, the challenge becomes photographing your subject in new and interesting ways. I'd get bored in a hurry taking the same shot over and over, and I do love a challenge!
When I planted my callas this year, I added a new garden for some of them, now I have callas in 4 different areas of our property, which gives me a variety of light to choose from, and I can shoot them at just about any time of day. I'm always looking for new varieties, and add a few to my collection each spring.
Here are a few images I've taken over the summer. The good news for me is that I still have callas blooming, so I'm not finished yet!
Happy shooting!
Kathleen Clemons
Tuesday, September 4, 2007
Some new ideas...
Hi all!!! Well, the ole' brain's been working on overtime lately and I have a bunch of new ideas. I also picked up a sound trigger that allows me to do some funky things. It hooks up to the camera and when the attached microphone here's a noise it trips the shutter. Here's a few examples...
Also, on the standard still front I found these amazing glass syringes that I've been searching for. I've had this idea for an image for ages but needed the right hypo's to work well... They backlight so well...
And to show that my photography isn't one sided, I went to Hawaii on a shoot recently and clicked this one...
Well, that's what I've been up to. Hope you enjoy lookin' as much as I enjoyed clickin'...
Dave
Subscribe to:
Posts (Atom)