As you may recall, a few days ago, I raised the question of 'integrity' when it comes to the dramatic alteration of one's photograph via Photoshop. In case you missed it, I have uploaded both of the photographs again and the image on top is the original while the image below was altered via Photoshop; namely I replaced the foreground grasses and distant road with another photograph that included a foreground of a sandy beach.

I received more than 450 emails to my question, "Do we have an obligation to tell the viewer when a photograph has been dramatically altered in Photo-Shop?" and the votes are now in!
Before sharing with you the results of this unscientific survey, many of you made it clear that there is only one area in photography that is deserving of the "death penalty" if one is found to have dramatically altered an image and that is the area of Photo-Journalism/Documentary Photography. But, and to my amazement, 41% of you felt that when a photographer dramatically alters an image he or she is NOT obligated to tell anyone, unless asked. And a few of you even stated, that if asked, you would simply say, "That's none of your business!" There were a variety of reasons why most felt they had no obligation to tell anyone if the image was dramatically altered, but suffice it to say, all of the reasons could be easily quantified as "artistic license".
Personally, I have NO problem with any image that has been dramatically altered, as long as it is 'believable' OR so obviously altered that it's not even a question e.g. fantasy, dream-like photographs. I don't mind the 'lie' that is created from a dramatically altered image, since I have felt for years that every photograph is a 'lie' anyway, but my problem with the dramatically altered 'lie' is that it can lead one to believe that a given landscape or cityscape really does "look like that" when, as it turns out, there is no such place on earth.
Several years ago, I came upon a really beautiful image of a street scene in Paris. It was an image I saw on a photographers website. In the foreground was the street sign, Rue Ravoli. A few weeks later I was in Paris and I tracked down this 'street' and as you might have guessed, the street I vividly recalled in the photograph was nothing like the street I was standing on. There were only two buildings that I recognized and everything else on that street was an obvious composite of other shops and cafes that were probably taken in other parts of Paris. On a strictly personal level, I tipped my hat to the photographer who obviously possessed some terrific Photo-Shop skills. It was clearly one of the best Photo-Shop composites I had ever seen. But, on the other hand, I was disappointed that such a place did not exist, if only because I wanted to see what I might be able to do, photographically, on that same street.
If you know me at all, I am 'old school'; I am a big fan of "getting it right in camera". For the longest time I have taken great pride in meeting the personal challenge of creating unique images and since the advent of Photoshop I have at times felt quite smug, knowing that I got 'that' image without the use of Photoshop. I love it when someone asks, "Did you do 'that' in Photoshop?" and with the biggest smile across my face, I say, honestly and often emphatically, "Nope, it was all done in camera!"
Since last week however, I now find myself thinking about my "get it done in camera" attitude and I must confess, I have now come under my own suspicion!
How many times have I 'dramatically altered' a scene before actually photographing it? In 35 years of shooting that answer would be at least a few dozen times, I am sure! One such scene that I recall vividly stands out more than any other and ironically it also involves a city street, a city street that was dramatically altered, all for the sake of a photograph. I was hired by an advertising agency to photograph a European street scene, complete with a Bakery, Café and a Newsstand. I scouted various locations and hired set-builders, stylists and of course 'European' models and several weeks later the shot of the European street was taken in the early morning hours in downtown Portland, Oregon!
The shoot itself lasted about two hours and by that afternoon, all that was left of the European street scene were 11 rolls of 36-exposure slide film. The 'lie' had been successfully recorded and now that 'lie' would continue as the State of Oregon Tourism Dept. began running two-page spread advertisements in many national magazines, promoting Portland as a European city alternative.
This is of course my most extreme example of being party to a dramatically altered image. Clearly, most shooters don't think twice about dramatically altering the scene before them, as long as any changes are done before they take the picture. Why is that approach any less 'dishonest' than the dramatically altered images done by others with the aid of Photoshop? As for me, I had been struggling with that question all week.
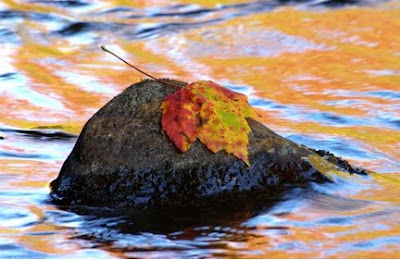
What if I make only minor alterations to a scene before I take the picture? Am I still 'guilty' of altering an image if I ADD or SUBTRACT just a few things? The image above has been altered. How has it been altered? I placed the leaf you see on that rock there, in full view of several of my students. Does it look 'natural', believable? Before answering that there is another part of this story that you need to hear. Within ten minutes of placing that leaf on this rock, several other photographers who were not part of my workshop had arrived in the same area, and myself and several of my students overheard the following remark made by one of the photographers, "Wow, check out the leaf on the rock!" And without hesitation both of these photographers set up their cameras and tripods and fired away. As far as they were concerned, the leaf that on that rock was natural!
The debate over 'natural' or 'altered' images is really OLD NEWS! In fact it can be argued that every lens choice, every point of view, every 'creative exposure', every filter, to name a few from the list, are all guilty of 'altering' an image. As far as I am concerned, you can even add the mere act of framing the image in-camera as another example of altering an image! Let's look at several examples and see if you don't agree.
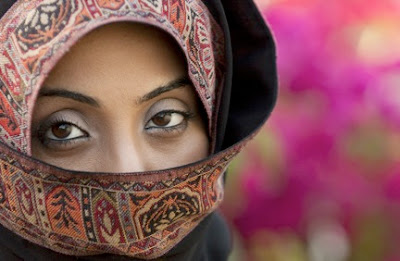
The image you see here has been altered dramatically, yet I will add that it was altered 100% in-camera and without the aid of Photoshop, NOT that that should matter! It was altered 100% by LENS CHOICE, POINT OF VIEW and a LARGE LENS OPENING. We can all agree that the woman you see here is probably of Middle-Eastern descent, but after that, it's anybody's guess what the rest of the story might be.
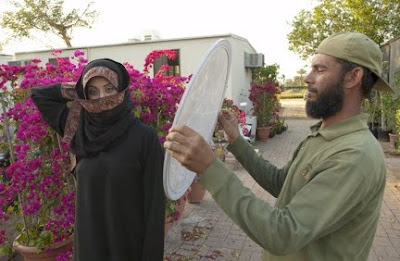
One thing is sure. Without benefit of the photograph below, you would have never guessed that this image was made in a nursery next to a trailer, and with the aid of an assistant who is reflecting some warm light onto her face. In addition, the model did not have the right pins to hold her headscarf in place so she had to use one of her hands to hold the headscarf in place while I took the shot! With the telephoto lens and a large aperture, I was able to render a shallow depth of field AND with the right point of view I was also able to avoid recording any part of the trailer in the background. When we consider the subject and the surroundings, there is no question that I have dramatically altered the scene to get to my end result.
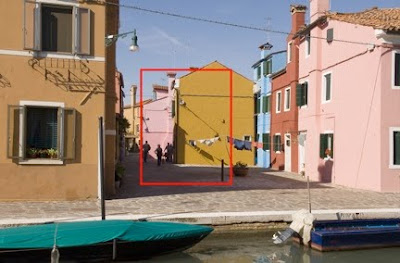
One more example and I will then turn this debate over to you. In the photograph below we see a woman in a red sweater, doing her laundry, along with several other women in the background, walking in the shadows. Once again, it's anybody's guess what the rest of the story might be, but rest assured, the image you are looking at has also been 'dramatically altered'. It is an image that was cropped, in camera, by the use of a long telephoto lens and further 'altered' by manipulating a deliberate in-camera under-exposure so the shadows would go black. And again, not that it matters, but this image was also done in-camera.
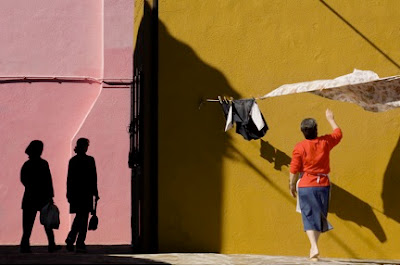
As you now have the benefit of the 'bigger' picture below, it becomes readily apparent that the above image was indeed altered. Again, with my telephoto lens, I was able to cut through the surrounding 'clutter' and arrive at what I determined to be the much cleaner composition in the photograph above. So, again, by the mere act of LENS CHOICE, I have created a compelling composition of a very small part of the larger scene before me. Like it or not, I am once again, guilty of altering an image.
 Every photograph is a 'lie', yet within that 'lie' is a mountain of truth, a truth that is perhaps best defined as a "The Sizzle!"
Years ago, like many photographers who are just starting out, I needed to have a 'real' job to support myself initially. One of those jobs was selling insulation and storm windows to homeowners and I remember the sales manager's advice to all of us in our weekly sales meetings-"Sell the sizzle not the steak!" In other words, appeal to the customer's emotions (the"sizzle") and when you sell the sizzle, most customers will be quick to buy the steak!
When I think about memorable photographs, images that truly do leave a lasting impression, it's fair to say they all have a common thread. They are images that "sizzle", they are images that excite or ignite the emotions of the viewer.
Your camera's viewfinder, combined with a given lens choice, point of view and an understanding of light, exposure and composition fundamentals, is able to record an image of great emotion, regardless of the overall truth that was surrounding the image.
I can think of countless images I have taken that suggested 'peace', 'joy', 'elation', 'sensuality' or 'sorrow'. Yet, if you saw the 'big picture', your reaction might be quite different. Prior to the digital age we now live in, all photographs were made with film and for those of us who shot color slide film exclusively, myself included, a cloud of suspicion rarely hung over us. (Make note of that word 'suspicion'.)
Since the digital age, and with greater frequency, the emails I receive from readers raise the question, "Did you do that in Photoshop?" It is a fair question, and for the most part, the answer is no, but the fact remains, a cloud of suspicion is a constant in my photographic life today as it is or many other shooters. However, just this past week, I have concluded, that it has been my attitude towards "dramatically altering an image in Photoshop" that is behind this cloud of suspicion because I, like so many others have been preaching for way too long that it is somehow far more noble and far more an indicator of one's creativity if you can get the shot in camera! Yet, as I have just shared with you, I now realize that I have been altering images, sometimes dramatically, in camera for years, but what is the difference between doing it in camera or in Photoshop? Seriously, what is the difference!? I am not only 'guilty' of altering images for years, but also equally 'guilty' of arrogance!
Going forward, I will continue to use the same barometer I have used for years when looking at the work of other photographers; "Does this image make me feel, does it excite or ignite my emotions, does the image sizzle? Whether or not its 'real' or believable is really NOT important, (crime scene photographs, passport and drivers license photographs being the exception!)
And if and when I start dramatically altering images with the aid of Photoshop, I will be the first to answer, "Yes I did!" should anyone ask if I did that in Photoshop. I finally understand that for many shooters, Photoshop is their main tool for creating much of their compelling imagery. And if it's Photoshop that accounts for much of your "sizzling" work I'll still gladly be buying your steak!
To be clear I am a big believer in getting most if not all of my 'dramatic alterations' done in-camera; moving objects, adding objects, subtracting objects, creating blur, adding sharpness, seeking out appropriate backgrounds, manipulating exposure, or the occasional use of my flash to create sunlight and of course focusing on the final arrangement, (lens choice and point of view), which will result in the most effective composition. My reason is a simple one: doing my dramatic alterations in-camera is simply quicker than the hour or so I might need to do the same thing in Photo-Shop.
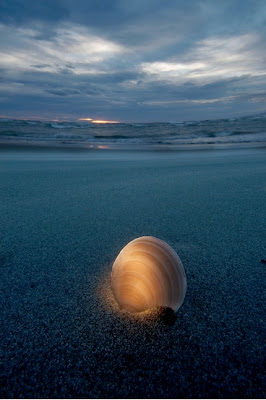
And finally in closing, I wanted to share with you another example where, truth be told, I have dramatically altered the image. My first dramatic alteration to this scene was adding a seashell, on its side no less, to an otherwise empty oasis of sand. My second dramatic alteration was adding light where NO light ever existed, thanks in large part to a small flashlight. My third and somewhat less dramatic alteration was setting my White Balance to Incandescent/Tungsten. This made the overall scene blue. My fourth and even less of a dramatic alteration was the use of a full frame fish-eye lens. Dramatically altered? You bet, but hey, at least I didn't use Photo-Shop-LOL!
Yes, let me know your thoughts if you feel compelled to share them in the comments below!


 If you are in the market for a tripod, I do not know of a better time to buy one then right now! Why? You will find out in a moment, but first when should you use a tripod?
 When you are doing close-up photography, when you want to keep your horizon lines straight, when you need to lock up your mirror, when you are zooming during long exposures, when you get down low to foreground interest and you want a great depth of field, when you shoot in a meadow of flowers and you are isolating a single flower, when you are shooting with rear-curtain sync and your flash.
 When you are shooting star trails at night, when you shoot the moon, when you shoot a sunset at the beach, when you want to shoot a panorama.
 I also work fast. The nine-month-old in this group photo was cooperating, but I knew
 To fine tune the exposure, I took an incident reading, placing my handheld under an
 This particular client prefers black and white images, but I will shoot in RAW and convert later using NIK Silver Effex or the Adobe Photoshop b/w adjustment layer. Even though my client wants black and white, I would rather have color files in case she also wants color photos.
 Of course I wanted to record the sense of motion that one experiences when driving through tunnels, which meant I would need a 'slow' shutter speed of at least 1/2 if not a full second. And in order to determine what aperture I would need to use at these speeds I needed to take a meter reading under a lighting condition that would be similar to the light we would find inside the tunnel. Getting that meter reading actually proved rather easy, as I suggested that we first drive through the tunnel, without the camera mounted on the car, but rather with the sunroof open, which then allowed me to shoot down onto the hood of the car and take my meter reading. Once we were inside the tunnel I stood up, and with my 17-55mm lens and camera set to 100 ISO, I simply pointed it at the hood of the car in Aperture Priority and found that when I chose f/8 I had a correct exposure indication of 1/2 second and of course at f/11 the correct exposure was now indicating1 second.
  Here is the set-up with the camera and fish-eye lens suction cupped to the hood of Phillipe's car. Honestly, it was my experience that this Bogen Suction Cup made a bond that was as strong as steel! You will also need a Bogen mounting plate for the camera, which in turn gets attached to the suction cup.
 I received more than 450 emails to my question, "Do we have an obligation to tell the viewer when a photograph has been dramatically altered in Photo-Shop?" and the votes are now in!
 What if I make only minor alterations to a scene before I take the picture? Am I still 'guilty' of altering an image if I ADD or SUBTRACT just a few things? The image above has been altered. How has it been altered? I placed the leaf you see on that rock there, in full view of several of my students. Does it look 'natural', believable? Before answering that there is another part of this story that you need to hear. Within ten minutes of placing that leaf on this rock, several other photographers who were not part of my workshop had arrived in the same area, and myself and several of my students overheard the following remark made by one of the photographers, "Wow, check out the leaf on the rock!" And without hesitation both of these photographers set up their cameras and tripods and fired away. As far as they were concerned, the leaf that on that rock was natural!
  The image you see here has been altered dramatically, yet I will add that it was altered 100% in-camera and without the aid of Photoshop, NOT that that should matter! It was altered 100% by LENS CHOICE, POINT OF VIEW and a LARGE LENS OPENING. We can all agree that the woman you see here is probably of Middle-Eastern descent, but after that, it's anybody's guess what the rest of the story might be.
 One more example and I will then turn this debate over to you. In the photograph below we see a woman in a red sweater, doing her laundry, along with several other women in the background, walking in the shadows. Once again, it's anybody's guess what the rest of the story might be, but rest assured, the image you are looking at has also been 'dramatically altered'. It is an image that was cropped, in camera, by the use of a long telephoto lens and further 'altered' by manipulating a deliberate in-camera under-exposure so the shadows would go black. And again, not that it matters, but this image was also done in-camera.
 As you now have the benefit of the 'bigger' picture below, it becomes readily apparent that the above image was indeed altered. Again, with my telephoto lens, I was able to cut through the surrounding 'clutter' and arrive at what I determined to be the much cleaner composition in the photograph above. So, again, by the mere act of LENS CHOICE, I have created a compelling composition of a very small part of the larger scene before me. Like it or not, I am once again, guilty of altering an image.
 Every photograph is a 'lie', yet within that 'lie' is a mountain of truth, a truth that is perhaps best defined as a "The Sizzle!"
 Yes, let me know your thoughts if you feel compelled to share them in the comments below!
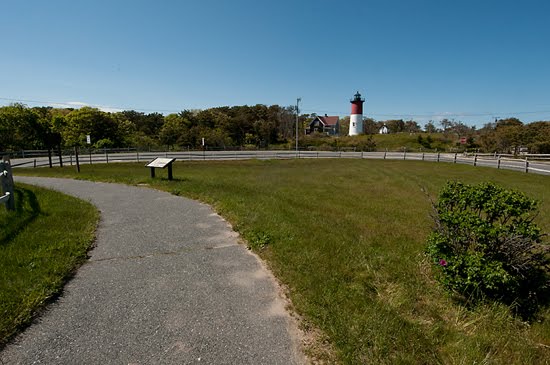 Well, as you can clearly see in the first photograph, this particular lighthouse was nowhere near any beach or pounding surf. In fact, I remember commenting to myself upon seeing this particular lighthouse "Whose idea was it to build a lighthouse in the woods?"
 Most of the students walked ahead of me, proceeding across the street and up the small trail to the lighthouse. I and one other student stayed behind, as I felt the ONLY real shot worth taking here would be from the grassy area, where you can see a lone tea cup rose bush-(note the area that I have boxed).
 Combining my Nikkor 12-24mm lens with the Canon 500D close-up filter, I was able to move in really close to a single rose bloom and frame up the scene you see here.
 This particular image was also shot with my 12-24mm but at an aperture of f/16 and not surprising, unlike the wide-angle shot of the tea rose above, this image is super sharp, from front to back due to the use of the smaller aperture of f/16.
 Here is that image for all to see (If you don't know a thing about LAYERS, get signed up for Jon Canfeld's class-NOW!)
