MAKING A SPLASH
A tip from
PPSOP instructor David NightingaleOne of the hardest photographic lessons to learn is that your camera sees things differently to you. For example, when you shoot a backlit portrait and rely on your camera's meter to determine the exposure, you will often find that you end up with a shot where your subject is too dark and the background is too bright. The problem here is that our ability to perceive dynamic range - the ratio between the darkest and lightest areas of a scene, or 'contrast ratio' - far exceeds the sensitivity of our camera's sensor, i.e. it's just not capable of recording detail in both the brightest AND darkest areas simultaneously. In these circumstances then, we have three choices. First, we can wait for better light, or move our subject into the shade. Second, we can artificially lower the contrast ratio between our subject and background by adding some light using fill-flash or a reflector. Both of these methods will reduce the contrast ratio between your subject and the background, allowing you to record detail in both areas of the image. Third, rather than relying on your metered exposure you can take a meter reading from your subject rather than the scene as a whole. This will lighten your subject, but will probably blow out at least some of the details in the background. Whichever of these methods you use, you can guarantee that it will produce a better image than the metered exposure.
In the example we're going to discuss in this week's tip though we have the opposite problem, i.e. the contrast ratio between the darkest and lightest areas of the original scene is quite low. If you take a look at the original image (a shot of a waterfall at the Dubai International Financial Centre) you will see what I mean - it's a rather dull, flat shot.
If we take a look at the histogram we can see why: the majority of the tones are bunched just to the left of the middle. In other words, we have lots of fairly dark mid-tone values but relatively few bright highlights or deep shadow detail.
In this case then my perception of the scene - as a bright, dynamic composition - is at odds with the reality that my camera's sensor recorded: the contrast ratio was lower than it appeared. Again, there are a variety of solutions. I could have waited for better light, or added some directional strobe light, but I also knew that this would be really easy to adjust during post-production, i.e. by using a couple of relatively straightforward techniques I would be able to produce a much more striking image.
So, let's take a look at the three, relatively straightforward changes that were made to this image during post-production.
Before we do though, if you'd like to take a more detailed look at the various adjustments that were made to this image, you can download a copy of the PSD file (1.5MB) here:
http://www.chromasia.com/.../ppsop_tip_mas.psd.zipCROP AND ROTATION
The first change I made, as you can see below, was to flip the image horizontally, rotate it 90 degrees clockwise, and then crop the image to 16x9 aspect ratio. None of these changes were strictly necessary, but I decided that I was going to aim for a fairly abstract image from the outset; one that would really emphasise the interplay between the brightest and darkest areas of the image.
INCREASING THE CONTRAST
If you have already downloaded and opened the PSD file you will have noticed that this image was adjusted using just three curves. The first two - Curves 1 and Curves 2 - were used to add a dramatic increase in contrast.
Curves 1
As you can see from the image below Curves 1 is a strong S-Curve (a term that is used to describe this shape of curve) that significantly brightens the highlights and deepens the shadows. In other words, it increases the contrast ratio between the brightest and darkest areas.
Curves 2
Curves 2 is also an S-Curve, and again, it brightens the highlights and deepens the shadows.
If you've familiar with the Curves Tool in Photoshop you may be wondering why I used two Curves when I could probably have just used a stronger S-Curve from the outset, i.e. one adjustment layer rather than two. The reason, in this instance, is that it's often quite difficult to get exactly the right tonal balance when you've making a very large change in contrast, i.e. moving any of the control points on a single curve can have quite a profound effect on the appearance of the final image. If you use two curves, on the other hand, it's often much easier to fine tune the effect and get exactly the right balance of tones.
The net result of these changes, as you can see below, is that the image is now considerably more interesting: the detail within the stream of water is now much more pronounced, and the image as a whole appears to have more depth.
At this stage, I could have stopped - the image is a big improvement on the original - but I decided to accentuate the almost abstract nature of the image by toning it.
TONING THE IMAGE
There are a whole variety of tools and techniques you can use to tone an image, but in this instance I used another Curve, as illustrated below.
In this instance, rather than altering the RGB composite curve, I altered both the Green and Blue curves (to do this you just need to select one of the individual channels using the drop-down menu towards the top-left of the Curves dialog).
The change to the blue curve is probably self-explanatory; by adding a control point to the middle of this curve, and dragging the line to the left, I added some blue to the midtones. By contrast, by adding a control point to the green curve and dragging the line to the right, I removed some green from the midtones. While it's easy to imagine the effect that adding blue will have - the image will be more blue - it's a bit harder to visualize what effect removing a colour will have. What does less green look like? There is an easier way to think about this though, i.e. when you lower the amount of a specific colour within an image you proportionally increase the amount of it's complimentary colour. If you're unfamiliar with this term, take a look at the screen grab below.
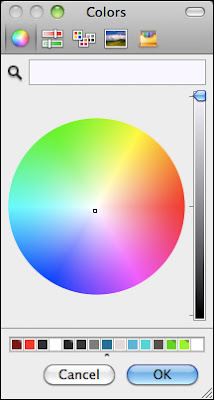
If you look around the border of the image in a clockwise direction, starting on the right, you will see that red fades into magenta which then fades into blue, then cyan, the green, yellow, and then back to red. So, the primary colours - red, green and blue - are separated by the secondary colours; magenta, cyan, and yellow. To find a complementary colour, just look to the opposite side of the colour wheel. For green then, the complementary colour is magenta, so by using a curve to lower the amount of green in the mid-tones I added magenta. By the same token, had I wanted to add a cyan cast to the image, I could have dragged the red curve to the right.
SUMMARY
As I hope the above has demonstrated, creating a striking and dynamic image from a rather dull, flat original is relatively straightforward; often requiring no more than two or three simple steps.
FURTHER READING
If you‚ are interested in exploring any of these techniques in more depth, take a look at my
online Photoshop tutorials. The two that you'll find especially useful are linked below.
Tonal Range and the Curves tool: this tutorial provides an in-depth discussion of the Curves tool (this is a free tutorial).
Toning Color Images: this tutorial discusses a variety of tools and techniques you can employ to tone your colour images; including the Channel Mixer, the Selective Color tool and the Curves tool. (available to our annual subscribers and lifetime members).


