Wednesday, December 24, 2008


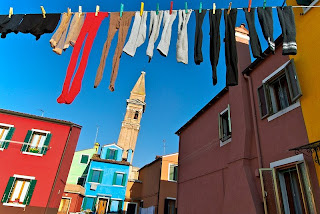
What a View!, originally uploaded by Chinaphotoworkshop.

China is developing fast by means of modernization and urbanization. However, I saw enough evidence of those, and really hope to find the traditional cultural side of China. During a short trip to China in late November, I visited couple of well preserved ancient towns, Xitang is one of them.

I brought my Canon 5D, and 3 lenses: Canon 24-70mm, 70-200mm, and Sigma 8mm fisheye. It's a day-time visit to Xitang, The Sun is strong and shadow is harsh, the actual dynamic range is beyond the camera sensor's capability for a single well exposed image. You have to either sacrifice the highlight detail or shadow detail (The structures on the left bank would have been very dark if the structures on the right bank are exposed correctly). But this is the perfect opportunity to try out High Dynamic Range image, standing on a bridge, with camera on the tripod and focal length of 24mm, I made total of 7 exposures at with 1 stop difference on each. The darkest exposure shows the shadow detail and the lightest exposure shows the highlight detail of the sky.

At home, I imported all 7 exposures into Photomatix Pro, created a HDR image, then processed it through detail enhancer, and brought it back to photoshop and made some curves tweak, here you go. This is the final image.

More HDR images of Xitang

William Yu
www.chinaphotoworkshop.com

Friday, October 31, 2008


ELECTION YEAR SPECIAL!
LET'S GET THIS ECONOMY MOVING!
10% OFF ON ALL JANUARY CLASSES!


Next session at PPSOP.net starts Jan 9, 2009

US$ 175 for 4-Week Classes
US$ 355 for 8-Week Classes

10% OFF DISCOUNT ENDS DECEMBER 21ST, 2008

Thursday, October 2, 2008

Bruce Smith Fashion Photography Master Class
DIPLOMA


Each student that reaches a satisfactory level during the online class at PPSOP
will
receive a Diploma certificate to show their level of achievment.

Levels of achievment that can be gained.

Distinction - Merit - Pass

Wednesday, September 10, 2008

I'm the new instructor at PPSOP and I'm also new to blogging. Come to think of it I'm new to these machines too. (I am taking courses though).
With almost 5,500 jobs under my belt and just short of 50 years as a shooter (5 studios in NYC) I hope my students overlook my spotty computer skills and tap into what I call a career filled with excitement, adventure, travel, creativity, financial ups and downs, problem solving, lasting friendships and I could go on for a page,  all good.
Bottom line is that in this highly competitive, over crowded, fickle, fast moving and changing profession/art form, if you love it it will love you back.
I think my job at PPSOP is to turn this love into financial gain and still keep the love fires burning.
Some of the courses I'm working on are: (and I would love some feedback about your interest in them)
ESTIMATING-I'm not talking about the big budget national adds I was lucky to work on but the kind of jobs for small firms like an Italian Restaurant, a Law firm, a Day care center, a small manufacturing firm, a fitness center. I shot plenty of  jobs like these and whatever the  budget they require production value and that means a well thought out, realistic estimate.
LEARNING TO LIGHT IN THE DARK-For about 20 bucks spent at your hardware store, Staples and/or an art supply store you can put together enough stuff to take this course and ONCE AND FOR ALL learn the basics of lighting. I WILL take the mystery out of lighting with my 4-D's of lighting program.
DIRECTING NON-PROFESSIONAL TALENT-Stock is king and those photographer expecting to make a living on original assignments are unrealistic and if you don't live in a city with a decent supply of models you will have to tap into your local market of farmers, fireman and florists for your stock pictures. I can help you get the best out "real" people.
CHOOSING A SHOOT THEME-My years as a commercial shooter taught me many disciplines, one of which was to focus on the problem at hand. ( the shooting assignment). If Art Directors could shoot their own pictures, they would. I found out pretty quickly in my career that my job was to take their idea and make it better. One of my favorite things to do was to location scout. I was very often too busy to do it and had to hire a location scout to do it for me.
 My ability to focus (not the camera) on the job also pretty much closed the door on my interest or ability to do personal projects. About 7 years ago I headed toward Nova Scotia after one of my daughters wedding (in Maine) and spent two week shooting for myself. Never did anything with the pictures and in the fall of '06  pulled them out. 2 images got my attention and I decided to take the plunge into taking pictures after so many years of making pictures. They were images of back (dirt) roads. In January of '07 I took off on the first of 9 2-3 day trips through out New England. My theme was back roads and that's all I was looking for. It was like location scouting without  specific location in mind. I had a ball! Each trip yielded  between 5 and 15 images. Ended up with about 65 keepers and almost keepers. Narrowed it down to 35 and I don't give a damn If anybody likes them, it was a totally liberating experience. I did it again this last summer ('08). My theme was "boats out of water". Did 2-5 day trips from the Canadian border down to New Haven, Conn. Again about 65 "images of interest" with about 25 or 30 keepers. I had another ball! Why were these projects such great experiences for me, that's easy. No restraints of any kind except the ones I put on myself. TAKE pictures of back roads and boats out of water. I would like to put together a course that would teach students to choose a theme to really focus on and cover it 8 ways to Sunday. I call it "Covering the job" whether it's a personal project or an assignment from a class or a real job for $. 
SPECIAL EFFECTS- In this age of Photoshop big productions and special effects have taken a back seat. The last couple hundred jobs I shot were often ended with this phrase form a young Mac-jockey art director, "don't worry Dave, I'll fix it  in the computer". I love to do the effects in camera or on the set. Making white clouds w/dry ice, smoke machines, snow machines, sweat a glass, can or bottle that stays sweated for hours, zoom during exposure, fog filter, shaking the camera, twisting the camera. using a camera stabilizer and on and on.
CAR SHOOTING-I shot  every car manufactured in the world except Russian and Chinese cars. Once you understand the concept of shooting cars your halfway there. Here's a clue. The most difficult car in the world to shoot is a black VW Beetle and the easiest is the DeLorien. (not sure of that spelling) Anybody got the answer?
Dave


Tuesday, September 9, 2008

Hello every one.

My tip for September.

USING FILL -IN FLASH to beat the falling light at the end of your days shoot.

If your shooting late in the day with that beautiful gold, contrasty light but you loosing this amazing light because the sun is goes down.

I am often in this situation but still need to shoot pictures that day.

Like on a shoot I was doing in Western Australia last December for a swimwear catalogue. We were shooting our last collection of swimwear for the day but the sun was going down very fast, I still had 4 shots left and they need to have a consistency with the rest of the shots Id been doing.

This is how I got over the problem:

I had my assistant holding a Californian Sunbounce mini reflector, with the gold foil cloth attached, at an angle pointing towards my model, high up to the left side of my position, I aimed a metz flash gun onto the reflector so it bounced lovely golden light onto my modeI.

I set the flash exposure to be approx 1.5 to 2 stops under the ambient light reading taken from my models position.

This is one of the shots taken using this technique.

Example of camera and flash settings:

My ambient reading (taken from the same position as my model) was 125th sec at f5.6, I adjusted the power output of the Metz flash gun to give me a flash reading, ( taken from the same position as my model ) of f2.8 to f2.8 and a half stop.

If you set the power any higher, the fill-in flash starts to take over the ambient light and starts to look like you have used flash on your shot.

This is why I choose to have my flash out put at 1.5 to 2 stops under the ambient reading. Try this yourself the next time your shooting late or your shooting in the shade..

Click on the photograph to visit my web album, there are c150 images on there. If you want to know how I achieved the images, just drop the images in the blog and ask how did you do this, I will tell you..

Most of not all of my images are lit very simply. NOT ROCKET SCIENCE..

Keep an eye out for my next fashion photography tip.

Why not post your own samples of your fill-in flash and tell us your techniques.

See my work http://www.brucesmithphotographer.com

I would like to introduce myself, I am Bruce Smith, I have been a pro fashion shooter for c30 years.

I just joined PPSOP to teach my fabulous online introduction course to shooting fashion photography.

Every week, for 8 weeks, each students will receive a simple, clear, and helpful lesson via email.

The weekly lessons will focus on a single topic.

For example, you'll learn how to:
Lesson 1: Research your ideas from magazines
Lesson 2: Put together your team models and stylists.
Lesson 3: Find your locations, interior or exteriors.
Lesson 4: Briefing your team
Lesson 5: Preparation before your shoot
Lesson 6: Shooting your main assignment
Lesson 7: Image selecting and editing
Lesson 8: Some basic techniques in Photoshop.

Go to the PPSOP web site for more details and signing up for this fabulous introduction to shooting fashion course: http://www.ppsop.com/fash.aspx

A New Book on How To Shoot Digital Fashion Photography

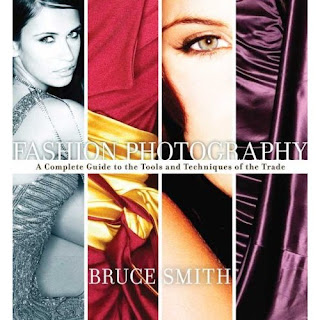
In early October my Fashion Photography, A Complete Guide, will be launched in the USA by Watson and Guptil. The book covers just about every topic you will need to learn to get started as a fashion photographer.
It will be a great companion to my Online Fashion Course with PPSOP.
I am looking forward to class starting. 12th September.

You will be able to order your copy via PPSOP.

Bruce Smith

Wednesday 9th September 2008


Bruce Smith

PAINTING WITH SHUTTER SPEED
Noooooooo Tripods Allowed!

Until recently, the 'rule' of photography has been to "keep the horizon line straight and above all else, make sure its in focus". It was also unthinkable for a photographer to deliberately handhold their camera at a very slow shutter speed without the aid of a tripod. For those who did venture out of this 'norm', they were often scoffed at because the resulting images were of course "blurry and out of focus" and on more than one occasion the photographer was asked "were you drunk when you took that shot?"

Fortunately times have changed and the idea of "painting with a slow shutter speed" has been embraced. But, unlike panning, which is already challenging enough, painting with a slow shutter speed is a real "hit or miss" affair, BUT when everything does come together, it is truly rewarding. (Have you priced 'abstract art" lately? Doing it yourself is not only 'cheaper', but since you 'painted' it yourself, its also that much more rewarding.

Painting with shutter speed is a simple technique really. The challenge is in finding the 'right' subject to paint. Once you feel you have found a subject to paint, you simply set a correct exposure that will allow you to use, a 1/4 or a 1/2 second shutter speed, and at the moment you press the shutter release, you twirl, arch, jiggle, or jerk the camera in and up and down, or side to side or round and round motion; PRESTO an instant abstract painting! Just as Monet discovered with his brush and canvas, flower gardens continue to be the number one choice of photographers for painting with shutter speed, but don't overlook other compositional patterns as well, such as boat harbors, fruit/vegetable markets and even the crowd in the stands at the NFL football match. Also, consider painting with shutter speed in low-light where shutter speeds can range from 2 to 8 seconds-the difference here is that your movements are slower then the quick and hurried 'jiggle' mentioned above, and the resulting effect can look like that of an artist who uses a palette knife as the exposure time builds up one layer upon another.

Not much is required to create some truly exciting abstract paintings with your camera other then a slow shutter speed and the willingness to perhaps look 'foolish' in the presence of others. Defying all the 'laws' of photography, strangers stop momentarily as they find it odd to see you with your camera pointed at a given subject, jiggling, spinning, jerking and/or turning your camera while pressing the shutter release, and they cant for the life of themselves understand what on earth you could possibly be so happy about it. You may even perhaps give the impression that you suffer from a nerve disorder which would no doubt accounts for why you cant obviously hold the camera steady. Like I said, we do look foolish, but do we really care?


PHOTO#1-#2-#3-A roadside flower bed in the heart of the city of Lyon France provides a welcomed reminder that spring has arrived, following a harsh and cold winter. Standing over a portion of this flower bed and shooting down with my camera and 12-24mm lens revealed a most interesting and energy filled composition that was reminiscent of those times I went to the county fair in my youth and gladly paid the man 25cents for a white piece of paper upon which I would squirt various colored paints and than this paper would spin for several seconds and reveal a kaleidoscope of colors. So how did I do it?

A rather simple technique here but you will want to call upon your wide angle zooms first and foremost AND your polarizing filter and/or your three/four stop neutral density filter.

Remember when creating these abstract works of art, we are calling upon these two filters primarily to decrease the intensity of the light, thus allowing us to use slower then normal shutter speeds, while still maintaining a correct exposure. With my 12-24mm set to the focal length of 12mm and fitted with a four -stop ND filter, I was able to set a correct exposure of f/11 at a 1/4 second and as I pressed the shutter release, I did the following:

I rotated the camera in a right to left circular motion, as if drawing a circle, and at the same time, with my left hand, I zoomed the lens from 12-24mm. And keep in mind all of this took place in a 1/4 second so you are right to assume that you must be quite fast in turning the camera in that circular motion and zooming at the same time.

In comparison to the next shot, I was able to slow down a bit as I repeated the same moves, but I had also changed my exposure from f/11 at a 1/4 second to f/22 for 1 second. Of course the choice is yours, but clearly the spiral effect that results leaves a bit more definition in the flowers at a 1/4 second then the exposure seen in the 1 second exposure. Are we having fun or what!?


PHOTO#4-#5-For some people, walls and doorways, covered with grafitti and posters are seen as unsightly, a blight of societies woes, but personally I have found them to be great fields of photographic potential, harvesting them often by the likes of my macro lens. But it was only recently that I discovered they are also a great resource to create 'art' with the principles described above. Again, with my camera and 12-24mm lens set to ISO 100 and equipped with a 4-stop ND filter, I was soon turning the camera and zooming the lens at the same time, moving from one wall or door to the next, shooting with such careless abandon, experiencing once again that feeling of newness that often accompanies every photographers first few days or weeks behind the camera.

A wall of poster covered windows and graffiti is quickly transformed into a swirl of color and textures. F/16 at a 1 second.


PHOTO#6-#7-Just around the corner I went to work on another wall of 'art' and this time, rather then spinning I simply moved the camera in a slow and upward direction, while at the same time, zooming the lens, quickly, in and out, in and out. Note in this exposure the somewhat stair-stepped effect, a layered palette knife painting effect. Again, this was the result of moving up and zooming in and out at the same time, rapidly over the course of my TWO second exposure. Nikon D2X, 12-24mm lens with 4-stop ND filter, ISO 100 f/16 for 2 seconds.


PHOTO#8-#9-Much of Europe's back roads and meadows are turned into carpets of red during the early part of May thanks to the perennial blooms of the red poppy. In fact up in the north of France, near Lille and as far as east as Strasbourg, acres upon acres of red fields can be seen. To many of the French, the sea of red poppies serve as a reminder of the blood that was lost by those who fought during one of WWII's most decisive battles fought in this area, the Battle of the Bulge.

Bringing my car to a sudden stop was quickly explained as I rounded a corner on a small country road after having just passed a lone farmhouse whose entire yard, front back and sides were rich in tall green grass and red poppies. After a quick knock on the door and receiving permission to take pictures on the property, I was soon immersed behind camera and lens. Of the many exposures I had hoped to shoot that morning, creating motion-filled shots were high on my list. From the front-lit side of the house, I made this exposure of a rather ho-hum, somewhat static composition, but it possessed all the ingredients I felt it needed to make a wonderful abstract of line/color and texture and all that was needed was for me to shoot it again at a much slower exposure while simply moving the camera in a steady upward flow. The first exposure was made with my camera and 12-24mm lens with the ISO at 100 at f/11 for a 1/250 second. The second exposure was made with the same camera and lens, but the lens was equipped with both the Nikkor Polarizing filter and my 4-stop ND filter which resulted in a light loss of six-stops. In order to recover these six stops, I simply re-adjusted my shutter speed from a 1/250 to a 1/125, to a 1/60, to a 1/30 to a 1/15 to a 1/8 to a 1/4 second where once again my meter was now indicating a correct exposure. However, I stopped the lens down further by one full stop, to f/16 which meant I now needed again to double my exposure time from a 1/4 second to a 1/2 second in order to return to a correct exposure. I then pressed the shutter release and simply moved the camera upward in a very smooth flow which resulted in recording the streaks of color and texture that you see here.

Bryan F Peterson
Founder/PPSOP
www.ppsop.net
"YOU CAN DO THIS – I KNOW YOU CAN!"

The calendar says September and for most of us that means the normally sunny days of summer will soon give way to the howling winds, rain and snow of winter. So I thought, what better time to share a really fun, easy to set-up, yet quite challenging photography tip that is guaranteed to end your summer with a "splash"!

Truth be told I have never been a big fan of flash and it all goes back to my early years as a photographer. I just found the use of flash not only unflattering to my subjects but for years, I could never fully understand how flash 'worked'.

That of course had to change, and it did, since it was an absolute necessity to succeed as a commercial assignment photographer, but whenever possible, I will still always opt for AVAILABLE LIGHT! And one of my favorite set-ups finds me in the great outdoors, taking full advantage of MID-DAY light! Yes you read that right, Bryan Peterson shoots during that God awful time of day called high-noon. Yep, these words of 'wisdom' about shooting in the mid-day light is coming from a guy who is quoted as saying that "the only reason to be out and about during mid-day light is to work on your suntan" but you know what? You can actually get some really cool "studio flash-like" exposures when shooting at mid-day, and you can still work on your tan while doing so! Now that's some darn good management of time!


In the first example, you will see my set up for shooting 'food photography". Along with a simple glass vase, filled with bubbly mineral water, (which is sitting atop a small table and an open 5-in-1 reflector, silver side up), I have added a 'seamless' colored backdrop of blue, (nothing more than a large piece of colored poster size paper found at any art supply store). My camera, along with the macro lens is mounted on tripod, set to focus close on what will soon be fruits falling very fast through this water, (strawberries in this case). Set your ISO to 400, I assuming it's a sunny day, you should be able to record a correct exposure at f/8 at a 1/200 or 1/1600 second, both plenty fast enough to freeze the falling strawberries. Also, before you or your assistant start dropping the strawberries into the vase of water, manually take one of the strawberries and hold it up near the glass in the same area where you wish to photograph it as it drops through the water and now focus on that spot, making certain to leave the focus of your camera in manual focus mode.

Now that I was all ready to go, I simply asked my daughter Sophie to drop a single strawberry into the water and fire away with the camera also set to Continuous Mode, (rapid fire mode) and after shooting for just a few minutes, I would stop and take a moment to review what 'luck' I was having and sure enough, I discovered that I recorded far too many images where the strawberry was either not far enough into the composition or it had dropped to far near the bottom of the composition, BUT by golly, in and amongst all of these missed opportunities, 87 missed opportunities to be exact, I found several jewels, one of which you see here.


Why stop at one strawberry when you can try three at a time? (I love the power of THREE which is why I chose three). And after several additional attempts, an image of three falling strawberries was also recorded as they broke through the surface of the water.


Note the lighting in both of these exposures. The strawberries are lit both from the sun above as well as from underneath due to the sunlight hitting the reflector and bouncing up from below. Who says you need strobes?

Obviously too, this set-up is NOT limited to strawberries! Let your imagination run wild and soon you will be dropping most anything that will fit into your vase and IF you can find a large enough vase, try dropping a slice of watermelon! Enjoy!

Bryan F Peterson
Founder/PPSOP
www.ppsop.net

Sunday, September 7, 2008

Beautiful Weeds


As an avid gardener, I try and keep the weeds in my gardens under control. Recently, one of my gardens has been taken over by a strangling, Morning Glory type of weed. But early one morning last week, I looked out the window and saw the weed in totally different light, literally and figuratively. I grabbed my camera with my Lensbaby 3G, ran to the garden and started shooting. I ended up making some of my favorite images of the summer, and was really glad I hadn't totally rid my garden of the pesky vine. Some images are just meant to be, and it pays to seize the moment!

Kathleen Clemons
Instructor of:
Capturing the Beauty of Flowers
Lensbaby Magic
The Art of Food Photography

Monday, July 14, 2008

Who FRAMED Roger Rabbit?


How many times have we read an article in a photography magazine or book that said to achieve better photographs we should frame our shots using things that are available to us in our own environment? Things like a tree branch or an arch. That’s all fine, but to make your images more personalized you need to explore new ways to frame, out of the conventional .

I must have been an explorer in my previous life. I love the unknown, taking chances, experimenting and finding new ways to approach and photograph things and then comparing the results. I find that this gives me so many more options and choices of images. It allows me to be more artistic and creative. So here is my photography tip of the day; try framing some of your shots and do it with great style. There are so many things right in front of your eyes just waiting to be used as a "natural" frame. Find them and use them to your advantage.

Break some rules! Who said the frame needs to be in the foreground? Who said the frame needs to cover less space than the subject? Who said the subject of the photo cannot also be the frame itself? And lastly, who said the frame needs to completely "frame" the four sides of the subject? Think outside the box!

Here are some samples I have encountered over the years:

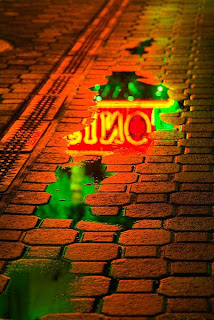
What about a rain puddle? Isn’t that a frame?
(see the picture at the beginning of this blog)


Danilo Piccioni © 2008 all right reserved.

Wednesday, May 14, 2008

Lighting Techniques of the Portrait Masters


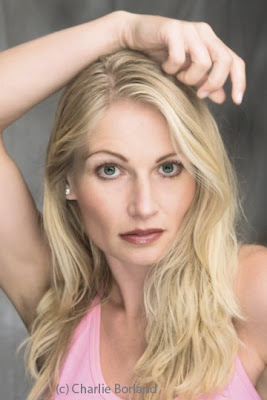
I was recently teaching Studio Lighting at Gulf Photo Plus in Dubai a few weeks ago with other PPSOP instructors and had the opportunity to work with the model Lenka. The goal of the workshop is similar to my online class here, to teach about learning to see light and sculpting your subjects with light.

There is not much difference between what a sculptor does in their art and a photographer using light. The sculptor uses tools to create a 3 dimensional work of art while the photographer uses light to sculpt their subject to appear 3-dimensional in a 2-dimensional medium.

For Lenka, I used a beauty lighting technique called over/under with one light above and the other under to create a key light and a fill light. This is a very nice way for photographing woman in a soft and flat light manner as it hides skin imperfections, blemishes, and wrinkles. In this image I then went further using skin softening and dream glow techniques to work on the eyes, nose, and mouth. These techniques and many more are in my class: Lighting Techniques of the Portrait Masters.

Charlie Borland
www.borlandphoto.com
Blog: www.thecommercialphotographer.net

Monday, April 14, 2008

Great Photography Tips (Flash Videos)


Photography Tips, covering different aspects of photography, are just added to PPSOP website. These great tips are in Flash video format, brought to you by Bryan F Peterson, the founder of The Perfect Picture School of Photography.

Monday, February 11, 2008

Gone in the rain with the wind

By Danilo Piccioni
The Italian Eye


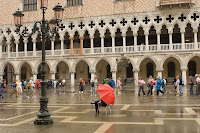
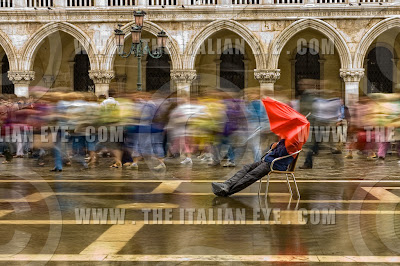
September 2006, I was assisting Bryan Peterson in one of his INCREDIBLE workshops. This one was in Venice and under constant rain, definitely not a September Italian kind of weather if you ask me!
Despite the weather, we tried to be inventive, we tried to be creative and make the best of the time we had together.
Sheltered from the rain standing under the colonnades in Piazza San Marco, I spotted an abandoned broken red umbrella inside a trash can, partially sticking out, looking as if it was screaming : Pick me! Pick me! Make me famous!
So I went and grabbed it and I said: let's do something with this.
In addition to the rain, there was a constant breeze that day and all the nearby cafes in the square were closed because of the unpleasant weather.What better chance for me to borrow one of the cafĂ©’s chairs and place it in the middle of the piazza and ask one of the students to pose for the shoot?


Doug was either a very good sport or he wanted to show off his new expensive rain proof clothing gear, but either way he sat with his boots in the water and held the umbrella against the wind and waited patiently for us to set up our tripods.
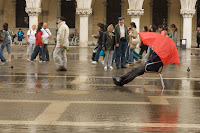
The first shot here shows how the image would look from a normal point of view: Standing up at eye level it’s not very flattering; everything is squashed down because of the deformation due to the wide angle lens; these incredibly beautiful buildings look short and fat and Doug sitting in the rain is just one of many things happening in my photo, not the subject.


I immediately changed lens from wide angle to medium tele, a 70 mm did the job quite nicely.
I also shortened the tripod down a lot and noticed that people passing by where causing the photograph to be overcrowded and distracting. I needed to isolate Doug from everything else.
That's when I decided to use a long exposure to create a sense of movement among the crowd and use them only as a colorful brush stroke effect in the background.


Using a long exposure allowed me to keep Doug and the Doge’s palace pin point sharp and blur everything else.
In order to achieve this and not over-expose the frame I had to add a Neutral Density filter in front of my lens. My frame was still over-exposed, so I decided to add my polarizer filter on top of it and increase the time to an even longer exposure.
I couldn't believe my eyes when suddenly a group of colorfully dressed Japanese tourists came along and I triggered away.

The result image?
Breath taking! And it was chosen as the front cover for SouraMagazine’s Nov-Dec issue, an internationally well known Fine Art photography Magazine in the UAE and in the industry.
Thank you, Doug, for being such a sport and a great looking model!


Click HERE to read the article and watch my images.
The Italian Eye © 2008

Wednesday, January 9, 2008

New Classes Start Soon!

Don't miss out on the fun as PPSOP kicks off 2008 with a full menu of fun and exciting courses that will surely give you a wealth of information. In addition to our most popular course, Understanding Exposure, we also have a several new and exciting courses designed just for you.

Check out Architectural Photography, Street Photography, A View From The Top, Portraits Unplugged, CS3 Workflow, Understanding Exposure II, Lighting Challenges, Lensbaby Magic, and a fresh and creative approach to Creative Composition. To see these, and all of our classes, simply go to http://www.ppsop.net/courses.aspx!

We know you will enjoy these and all of the great courses we offer, and look forward to meeting you "online" at The Perfect Picture School of Photography.