Tuesday, January 20, 2009

The Village in the Painting


Hongcun, 宏村

Do you remember the beautiful sceneries in the movie "Crouching Tiger, Hidden Dragon". I have recently visited the village where some of those impressive scenes of the movie were shot.

The village name is "Hong", it's about 6-hour-drive away from Shanghai. The ancient architectures in the village are well preserved, and it has been designated by United Nations as World Cultural Heritage Site. The entire village forms the shape of a bull and has unique ancient irrigation systems, providing waters to entire village. It's so gorgeous and peaceful that it is called "The Village In the Painting".

Frankly, this village is photographer's paradise. For portrait photographers, it's perfect place for environmental portraits, shooting local people in their living environment. For architectural photographers, the culturally distinctive "Hui" style houses and interior designs are presenting limitless opportunities. For landscape photographers, the village skyline, the lake at the front and the pound in the middle of the village are a few highlights among endless picture perfect spots. Spring and Fall are the best time for photography here, In late March, the canola plant(shiny yellow) and peach trees(pinky red) are in full blossom all around the village, and in late September, fall colors are surrounding the village. Well, I missed both seasons this time, but to me, no matter what time I come, this village is always beautiful.

I only have 2 lenses with me this time, Canon 24-70mm and Sigma 8mm fisheye. The fisheye is the new member of my camera bag, and I have fun with it. To use this lens properly, I have to focus really, really close to the subject, only few inches away. Another interesting observation of the image taken by this lens on a full frame camera: you will see the barrel wall of the lens in your image!

I will definitely come back to village again. This short trip is just the beginning, I would like see it through my camera in drizzle, in a cloudy day, in the fog, in the spring, in the fall, etc...

Ready for Market
This image was shot at early morning with Sigma 8mm fisheye, a lady brought out these baskets of vegetables, prepared for farmers' market. You can see clearly the screw lines on the barrel of the lens.

Drying Tofu
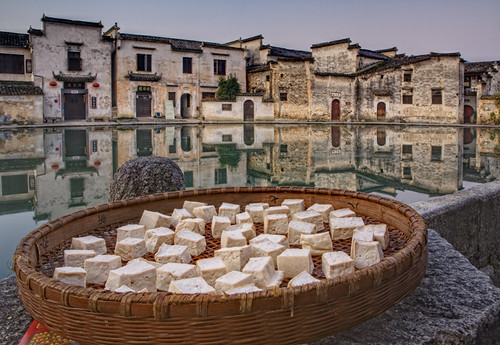
Early in the morning, someone is drying a basket of freshly made tofu on the side the pound in the middle of the village.

Hui Style Family Room 徽派民居
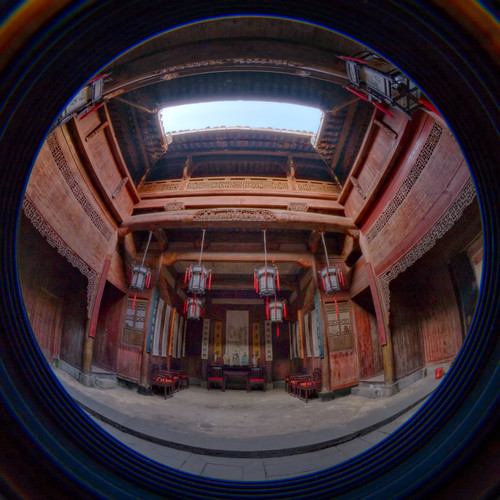
This is the typical courtyard of a "Hui" style house. I took a couple exposures with Sigma 8mm fisheye and created this HDR image.

Morning at Hongcun
A early morning shot of withering lotuses, at the lake in the front of the village.

Hongcun
A fisheye shot at the entrance bridge to the village.


William Yu

Thursday, January 15, 2009

BACKGROUNDS

A detective will say, What about his background? An employer will say, Tell me about your previous employment. A doctor will say, Tell me your medical history. Background "checks" are the norm in everyday life-except in photographic composition, (and marriage)! How many couples would even make it to the alter if one or the other spouse first did a thorough background check? Ah, but love is often blind, driven by emotion and passion and that same passion is what prevents so many photographers from recording some really great images.

Amateur photographers are often so taken by the subject before them that they fail to look at the background of their composition. And often times they still cannot see the problems with the background, even after processing the image on the computer.

What causes background trouble? Several things. At times it can be the wrong aperture (resulting in too much depth of field), not paying attention to light (resulting in too much contrast between light and dark), the wrong point of view (resulting in that telephone pole sticking out of your daughter's head). And then there are those jarring tones or shapes in the background that are a disturbing contrast to the focused subject (for example, that out-of-focus background of purple flowers makes for a disturbing tonal contrast when seen behind the bright red tulip).

The solution is a simple one, really it is! Get into the habit of asking yourself EVERY time (and before pressing the shutter release) "Does my background help or hurt the foreground focused subject?" Before long, this question becomes such an integral part of the shooting process that many students report that they actually spend time looking for the perfect background FIRST!

PHOTOS-My daughters and I had just returned from sledding at the nearby park, when my eyes caught site of some frozen icicles hanging off of the gareden hose.


I reached into my pocket and pulled out my Leica D-Lux 4, making the quick snapshot you see here. Clearly, the image you see here is a 'mess' and by a mess I mean that my one lone hanging piece of garden hose and icicles IS getting some serious competition from the background; competition from all of the other "lines" to be even more specific. The additional curvilenear lines from the garden hose and the horizontal lines from the siding of the house create a chaotic and confusing composition. All of this background confusion and chaos is akin to trying to watch and listen to the television reporter, reporting live from the scene, yet having to put up with the young kid in the background who is jumping up and down, waving his arms furiously, hoping to get his three seconds of fame.


I returned to the house and from the guest closet I grabbed the large red Christmas wreath box and unfolded it and placd it behind the lone piece of garden hose and icicles. I felt that I was now ready to make a much more compelling image.


Hand-holding my Leica D-Lux 4, I was able to compose that much stronger composition as this image shows. Gone is the confusing background, resulting in an image with far more impact, thanks to nothing more than a large red unfolded box. *Leica D-Lux 4 at 5.1mm, (effective 24mmm in 35mm terms) at f/4 at a 1/30 second with ISO 200.


And finally, when is the best time to shoot a vertical composition? Right after you shoot the horizontal composition! *Leica D-Lux 4 at 5.1mm, (effective 24mmm in 35mm terms) at f/4 at a 1/30 second with ISO 200.

*Unlike my 'bulky Nikon D-300, the little Leica D-Lux 4 (not much bigger than a pack of Marlboro 100's) offers up a host of valuable reasons why you might consider buying one for yourself! If you love macro, you will love its ability to focus down to 1/3 of an inch at the wide angle focal length. And speaking of focal lengths, it offers up an effective 5.1-12.8 zoom lens, (35mm equivalent is 24mm-60mm) and captures a 10+ mega-pixel file each and every time. In addition, it offers up the wide aperture of f/2 when shooting at the 24mm angle and f/2.8 when shooting on the 60mm end. That's fantastic news when shooting in low-light and/or when you forgot the tripod. Of course it offers up Aperture, Shutter, Program Modes BUT also full manual exposure and even manual focus! I love this camera! The only downside is that it's not cheap, ($865.00) but than it wouldn't truly be a Leica if it were! To learn more about this camera, click the link below.
http://www.adorama.com/ILCDLUX4BK.html?searchinfo=leica%20d-lux4&item_no=1

Happy Shooting Everyone!
Bryan F Peterson/Founder
www.ppsop.com

Monday, January 12, 2009

It is here where you will learn how a 1/125 second can provide a lifetime of memories!

I am often asked about the story behind a particular picture of mine, but none stands out more than the story I am about to share with your now.


In 1990, I was living in Bavaria, Germany. It was during the month of June, while traveling the many back roads of Northern Germany, near the town of Bremen, that I came upon numerous farmers who were out and about tending their livestock and fields. It was near one such farm that I actually ran out of gas and it was at this same farm where I caught site of a young farm girl who was at that moment, doing her best to catch a large baby pig that had got out of its pen. A few moments later, I met her Grandmother and learned that the young 'farm girl' was in fact her granddaughter, a 'city-girl' from Hamburg who was only visiting for the next two weeks. (I spoke just enough German to get myself in and out of trouble!)

Over the course of the next several hours, I not only made a number of images around the farm, including the picture of the Grandmother that you see here, but was also given a few liters of gas that would easily get me to the next gas station. After accepting the unexpected invitation for lunch, I found myself sitting down at the dining room table enjoying a very fulfilling German lunch of white garden potatoes in a white gravy sauce with fresh garden peas, fresh homemade bread and the "most tender, freshest chicken breast I have ever tasted!" It was at that moment, that the Grandmother explained, "Well it better be fresh, because it's the same chicken you photographed earlier today!"
Yikes, little did I know that I had immortalized this chicken!

Come join any number of our classes which start tomorrow, Friday January 9th, and we'll help you do an even better job of recording images that will provide a lifetime of memories!

All my best-
Bryan F Peterson
Founder/PPSOP


Saturday, January 3, 2009

A REALLY GREAT CLOSEUP LENS OPTION or ADDITION!

Have you been saving up your hard earned money for a macro lens? Do you already own a macro lens? Whether you are saving for a macro lens or you already have one, I would strongly recommend that you consider adding the Canon 500D close-up lens to your camera system. Do not confuse this ONE Close-up lens with those much lesser quality close-up filter sets. When it comes to a close-up “lens”, there is but one and Canon is KING!

Canon offers up three close-up lenses (the 250D, the 500 and the 500D) in various filter sizes ranging from 52mm to 77mm filter size. The 250D is recommended for focal lengths from 35mm to 150mm and the 500 and 500D are recommended for focal lengths between 70-300mm. Since most shooters own a telephoto zoom that goes to at least 200mm, I personally would recommend the purchase of the 500D only. (The 500 is a single element glass constructed lens and the 500D is a double element glass constructed lens which translates into a wee bit sharper image.) Depending on the filter size of your zoom lens, you will pay anywhere from $75.00 to $145.00:

http://www.adorama.com/Search-Results.tpl?page=searchresults&searchinfo=Canon&500D&closeup&lens

In the spring of 2008, I bought the Canon 500D, 77mm filters size, initially to use on my Nikkor 70-200mm f/2.8 zooms. After spending but a few hours in the garden with my 500D closeup filter attached to the front of my 70-200mm F/2.8 Nikkor lens, I was hooked on the practicality of owning this closeup lens. Once I sat down in front of the computer, I could see sharpness that easily compared to the sharpness normally obtained with my Micro-Nikkor 200mm lens. The only drawback that I could find was that the 500D renders only a 1/3 life-size magnification and that is when the 70-200mm lens is set to 200mm. But hey, if you are not all about the itty bitty crittters and primarily a flower and butterfly photographer, this is one option to seriously consider in lieu of buying that $1300.00 200mm Nikkor Micro lens or the 180mm Canon Macro lens. Add into this equation the size and weight of this filter, (pocket size and about the weight of a deck of cards), you are quick to arrive at the same “slam-dunk” conclusion that I did and order one right away. When I find myself heading out the door in one of my “traveling light moods”, I am quick to grab the 500D and put it in my front pants pocket and now I am ready for all those butterflies that may come my way gladly leaving behind the weight (2.5 lbs) of my 200mm Micro-Nikkor lens.

Althought this lens is intended for use with a telephoto lens, (heck it says so in Canon tech-spec sheets) I have made the discovery that the 500D, in combination with a super wide, such as my Nikkor 12-24mm lens allows me to capture even more “up close and personal” compositions. (The one and only word of caution that I can offer when using the 500D on a wide-angle lens is this: first remove your UV or Skylight filter as the combination of your protective filter and the 500D will cause vingnetting in the corners of your composition.)

Focus is also continuous with this filter meaning that when you find yourself shooting at the 200mm focal length at a distance of 7 inches, you can zoom back towards 70mm and the focus distance is still the same, 7 inches away, UNLIKE extension tubes which will find you needing to constantly re-adjusting the focus every time you zoom to a different focal length.


1


2

PHOTO#1-#2-There are of course many signs of spring, not the least of which are the return of flowers, bee’s and butterflies and along many a swampy river bank or pond, the dragonfly hatch is well on it’s way, to the delight of frogs everywhere. Lyon, France boasts the largest city park of all French cities and even come close to rivaling New York City’s Central Park in size. There is an abundance of critters every spring at the Park Tete D’Or, including the dragonflies that live on the edges of the several large ponds that encompass the flower gardens. Seated comfortably on the green grass that runs up to the edge one small pond, I spied several baby dragonflies, basking in the warm glow of the morning sunshine. Dawn had just arrived and at this hour, many insects are a bit slow to wakeup, allowing the photographer to work at rather close ranges without fear of the critters flying away. Like many people I know, even bugs and insects are slow to wake up. Hand-holding my camera and Nikkor 70-200mm VR lens at the 200mm focal length and with my aperture set to f/8, I focused as close as I could, adjusted the shutter speed until a 1/320 second indicated a correct exposure and fired off several frames. Needless to say, and I am sure you will agree, I need to get closer and fill that frame! The composition here is much like the guy whose seat is on the fourth level, last row, at a Laker’s basketball game.

Because I left the house in one of my ‘light moods’, I had but one option to get closer and it was right inside my pants pocket; the Canon 500D closeup lens. After threading on the close-up lens, I picked up and moved forward, until the lens was now focusing at its closest focusing point-three feet. With the focal length still set to 200mm, its now clear that this really is and was meant to be a composition of a baby dragonfly at rest.
My exposure here was also, f/8 at a 1/320 second.


3


4

PHOTO#3-#4-Silver Falls State Park continues to be one of Oregon’s best kept secrets. It is Oregon’s largest State Park, yet most outdoor enthusiast’s prefer to trek further north, in and around the famous Columbia River Gorge. That’s fine with me too, since I don’t have to deal with any crowds along the 9 miles of hiking trails. Plus, I dont have to worry about being in other people’s way or they getting in my way, when I stop to shoot any of the 11 very impressive waterfalls. Springtime is the ideal time to visit Silver Creek, if you want to see the waterfalls flowing at their peak. The spring run-off of the snowmelt from the Cascade Mountain Range causes the rivers to swell and the resulting water flow fills the canyons of Silver Falls State Park with thunderous roars. As the trail meanders down more than 50 stone steps, you step onto a somewhat level dirt trail and just around the corner you are met with the thunderous roar of the 160 feet tall North Falls. Its one of those obvious wide angle shots where you will be able to record the waterfalls, top to bottom and the surrounding forest, but on this day, I was determined to record an “up close and personal landscape” and I found just the right subject to make that happen, a salmon berry bush that was growing within inches of the trail. As you can see in the first example, and at the focal lenght of 18mm, my attempt at creating an up close and personal composition where the focus would be on the salmon berry bloom fell quite short of an “up close and personal landscape”. With my aperture set to wide open, f/4, and the focus on the flower itself, the resulting visual weight of emphasizing the flower did in fact work, but as I have mentioned, the bush and the flower itself is still too small inside the frame. The solution was an easy one. I reached into my camera bag and placed the Canon 500D close-up lens on my 12-24mm Nikkor lens and voila, I was now able to place the emphasis on the flower, yet do so within the much wider angle of view of 18mm. This is not just a close-up of a salmon berry bloom, but rather it’s a close-up of a salmon berry bloom “in the forest, near a large waterfall”. This kind of close-up photography in my mind is akin to “having your cake and eating it too”, since you not only record an intimate encounter with the flower, but you also record the ‘story behind it’. It is a way of looking at the world that is still very new and the possibilites are, not surprisingly, endless, thanks to the addition of the Canon 500D Close-up lens!

Bryan F. Peterson
Founder of PPSOP
HOW DO YOU METER FOR NIGHT SHOTS
and WHY YOU DON’T WANT TO SHOOT ‘AT NIGHT’?

Photographing a city skyline at night is a goal of many photographers. And more often than not, this goal is usually pursued shortly after the photographer has purchased their first tripod, since compositions of this type require ‘long’ exposures.

Beyond the need for a tripod, there still remains two important steps if one is going to find the experience of shooting a city skyline rewarding.

IF you make it a point to shoot your city skyline shortly after dusk, you will not only record an exposure with greater contrast and color, BUT you will also have no trouble in getting the correct exposure without the need to “bracket”. Beginning about fifteen minutes after sunset and lasting for the next ten minutes, the exposure time for the sky is now the same exposure time of the lighted cityscape in front of it. And this is true whether it’s a cloudy sky or clear sky. With your camera in Manual Exposure Mode and your aperture set to f/11, tilt the camera up towards the sky, just above the buildings and adjust your shutter speed until a correct exposure is indicated. Chances are with 200 ISO, you will record an exposure time of around 4 seconds. Re-compose the city scene before you and fire away! It is imperative that you get all of your shooting done during the next 10 minutes because the window of opportunity will soon turn to black.

Shooting city scenes against a ‘black sky’ is something you will want to avoid, since the dark, black sky does not offer up the much needed contrast/color separation that the dusky blue sky did. Compare for yourself in these two shots of the Tampa, Fl skyline.

The first image was shot 20 minutes after sunset while the second image was shot 35 minutes after sunset. Both images where shot with a Nikkor 17-35mm, at 20mm, f/11 for 4 seconds.


Bryan F. Peterson
Founder of PPSOP

Thursday, January 1, 2009

Classic Profile


Unlike human subjects, you can’t ask a pet to turn their head to the left or right, not move, smile and look at the camera. Well you can, they just won’t understand. So, it’s important when photographing pets to take a wide variety of shots, be creative and use different perspectives – one of them being a profile. Profiles make wonderful pet portraits. They are regal, classic and owners love them. Dogs with long muzzles look great in profile. Try to include a few profiles in your photo sessions. If you are photographing a pet that has a bad or missing eye, is scarred on one side or just does not want to face the camera, consider taking several profile shots.

Don’t forget the importance of backgrounds in your portraits. Dark, rich tones make striking backdrops for profiles and create a dramatic mood. It’s a great way to showcase a pet. And don’t forget about catch lights. Even though you only see one eye, you still need that catch light. It’s a little “spark” of life!

Pet Photography Course

Jill Flynn
visualharmonyphotography.com