Where in the world will you find a photography contest that offers $850 each month in cash prizes? Only here at PPSOP! Beginning today, every current and former student of PPSOP can participate in our monthly photo contest and have the chance to win a cash prize of $500.00 for 1st place, $250 for 2nd place or $100 for 3rd place. And the contest theme for the month of October is FASHION/BEAUTY (No Nude). Just log in, choose "Contest" in your class list, upload your ONE image by October 25th, and on October 30th the winners will be announced and displayed for all to see! Good luck to all of you!
Want to stay informed about future contests? Sign up for Email Updates and not only get the latest news, info and happenings at PPSOP, but also stay informed about new courses, and our new monthly photo contest!

Friday, October 12, 2007

Monday, October 8, 2007
Can a Picture Really Tell a Thousand Words?
We all have pictures in our mind’s eye of who we think people are. These images often define how we see. What is the purpose of a photographic portrait if we already know what we want to see? Can a picture really tell a thousand words, or is that picture already inside your head?
I dove into the world of the men-in-blue and opened my aperture, my eyes, and my heart. In a three part photo essay for The Southampton Press, eye on the viewfinder, inspired, I focused — macro style — on the Community Response Unit (CRU), a flagship division of the Southampton Town Police. I quickly realized that a group portrait would not say enough so for four months I traveled with each member individually and here's what emerged.
By Cheryl Machat Dorskind
Copyright, 2007
All Rights Reserved


I dove into the world of the men-in-blue and opened my aperture, my eyes, and my heart. In a three part photo essay for The Southampton Press, eye on the viewfinder, inspired, I focused — macro style — on the Community Response Unit (CRU), a flagship division of the Southampton Town Police. I quickly realized that a group portrait would not say enough so for four months I traveled with each member individually and here's what emerged.
By Cheryl Machat Dorskind
Copyright, 2007
All Rights Reserved


Sunday, September 30, 2007
Flying with camera gear
A question that I am frequently asked is how I carry my camera gear when travelling by plane. With all of the delays, missed connections, and damaged, stolen, or lost luggage these days, it can be quite stressful getting to your destination even if you don’t check any baggage.
The solution that has worked for me is coming up with a “travel kit” of gear that takes up very little space and will cover 99% of anything I ever want or need to shoot. I pack that gear into an “Airport Addicted” backpack made by Thinktank Photo along with most of my clothing. The airport addicted bag was designed to hold the maximum amount of gear possible while still meeting most airline carry-on restrictions. You would be amazed at what I can stuff in this bag and along with my expedition 5 backpack (loaded with the rest of my clothes) carried on as my one “personal item”, I can fit everything I need for a 5 day trip without having to check a single piece of luggage.
When I arrive at my destination, I simply move all the camera gear into my smaller backpack and move all of my clothes into the large one until I’m ready to head back to the airport.
The only down side to this is that the bag can get quite heavy, usually around 40 pounds fully packed, when you have a long way to walk! They have since come out with a “roller” version of this bag and if I traveled a lot more, I would seriously consider getting one.
Now that I’ve covered how I get my gear from here to there, I’ll share what I take and why I feel it’s such a good balance of function and space savings.
99% of what I shoot is between 17-200mm focal length. This includes macro work but a dedicated macro lens is fairly limited so I choose to carry a set of extension tubes to use with my 70-200mm lens. Throw in a 2X tele-converter and that one lens lets me shoot from extreme close-ups all the way out to 400mm. (That in itself is the most practical combination in my line-up.) I then bring a 17-40mm, and a 28-70mm and that’s it! They all share the same filter diameter which cuts down on accessories needed as well. My tripod, with the ballhead removed, attaches to the outside of the bag, my flash cards, spare batteries, and assorted filters are all tucked away in separate zippered compartments inside.
Here are some images of this set-up I quickly shot today while packing for my upcoming workshop in Maine with Kathleen Clemons. We will be driving the coastline of Maine for 4 days, shooting everything from lighthouses to lobsters, and I know that I have all the gear I need for anything that we find along the way.
Ron Goldman
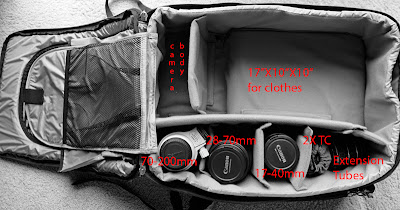 As you can see, there is plenty of room left for clothes in the main compartment, and there is a laptop compartment on the reverse side as well.
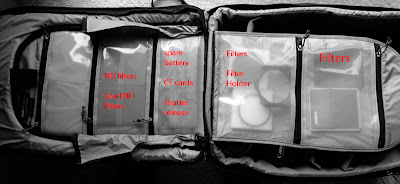 All of my accessories fit nicely in the top flap compartments.
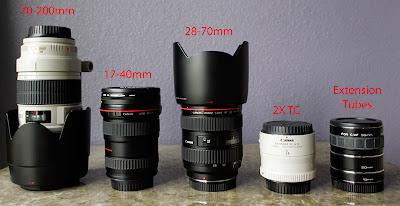 My "travel kit". Small, lightweight, and very functional.
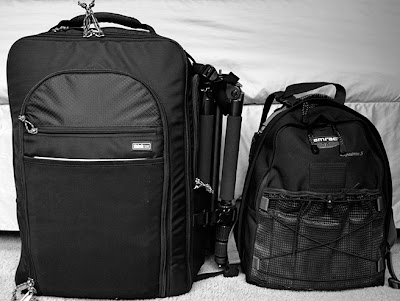 Both bags packed and ready to go. My small travel tripod is attached and the ballhead is safely stored away inside.
The solution that has worked for me is coming up with a “travel kit” of gear that takes up very little space and will cover 99% of anything I ever want or need to shoot. I pack that gear into an “Airport Addicted” backpack made by Thinktank Photo along with most of my clothing. The airport addicted bag was designed to hold the maximum amount of gear possible while still meeting most airline carry-on restrictions. You would be amazed at what I can stuff in this bag and along with my expedition 5 backpack (loaded with the rest of my clothes) carried on as my one “personal item”, I can fit everything I need for a 5 day trip without having to check a single piece of luggage.
When I arrive at my destination, I simply move all the camera gear into my smaller backpack and move all of my clothes into the large one until I’m ready to head back to the airport.
The only down side to this is that the bag can get quite heavy, usually around 40 pounds fully packed, when you have a long way to walk! They have since come out with a “roller” version of this bag and if I traveled a lot more, I would seriously consider getting one.
Now that I’ve covered how I get my gear from here to there, I’ll share what I take and why I feel it’s such a good balance of function and space savings.
99% of what I shoot is between 17-200mm focal length. This includes macro work but a dedicated macro lens is fairly limited so I choose to carry a set of extension tubes to use with my 70-200mm lens. Throw in a 2X tele-converter and that one lens lets me shoot from extreme close-ups all the way out to 400mm. (That in itself is the most practical combination in my line-up.) I then bring a 17-40mm, and a 28-70mm and that’s it! They all share the same filter diameter which cuts down on accessories needed as well. My tripod, with the ballhead removed, attaches to the outside of the bag, my flash cards, spare batteries, and assorted filters are all tucked away in separate zippered compartments inside.
Here are some images of this set-up I quickly shot today while packing for my upcoming workshop in Maine with Kathleen Clemons. We will be driving the coastline of Maine for 4 days, shooting everything from lighthouses to lobsters, and I know that I have all the gear I need for anything that we find along the way.
Ron Goldman
 As you can see, there is plenty of room left for clothes in the main compartment, and there is a laptop compartment on the reverse side as well.
 All of my accessories fit nicely in the top flap compartments.
 My "travel kit". Small, lightweight, and very functional.
 Both bags packed and ready to go. My small travel tripod is attached and the ballhead is safely stored away inside.
Wednesday, September 5, 2007
The Great Power of NO Color


by Danilo Piccioni
When thinking of black and white photography, the worst thing one could think is that B&W is a photograph without any color. It would be just as bad as thinking that a color image is a B&W photograph infested with colors. There are sixteen million shades of gray in the B&W world; trust me when I say that's a lot. There is no reason to think that a B&W picture is in any way inferior to a color one.
Typically a non-digital B&W shooter would use a colored filter attached to the camera; the filter allows the photographer to see the scene in B&W through the viewfinder so that he can decide how to shoot reality at its best using a different-color filter, e.g. yellow, red, green.
Today’s mid-range digital cameras have the option of shooting directly in BW or in color.
Now you just shoot and then decide later, and if you want, you can have them both.
If you are serious about B&W photography, you want to capture your exposures in color first, then convert it into B&W later in your Photoshop darkroom.
There are many different ways to create a B&W photograph in PS from a color shot. The worst thing you could do to your photograph is to chose the one-click method, to convert the color photo to grayscale.
These sample photographs show you the difference between a photograph that was converted with this automatic PS feature and the versions achieved by working with other methods in PS.
This and other tricks and techniques will be explained in full detail in my B&W course here and only here at Perfect Picture School of Photography.
Danilo Piccioni © 2007
Calla Addiction
Many of you already know that I have a calla lily addiction, I love them! They are my favorite flower to photograph, I find their lines and curves fascinating and so elegant. When you have a favorite subject, the challenge becomes photographing your subject in new and interesting ways. I'd get bored in a hurry taking the same shot over and over, and I do love a challenge!
When I planted my callas this year, I added a new garden for some of them, now I have callas in 4 different areas of our property, which gives me a variety of light to choose from, and I can shoot them at just about any time of day. I'm always looking for new varieties, and add a few to my collection each spring.
Here are a few images I've taken over the summer. The good news for me is that I still have callas blooming, so I'm not finished yet!


Happy shooting!
Kathleen Clemons
When I planted my callas this year, I added a new garden for some of them, now I have callas in 4 different areas of our property, which gives me a variety of light to choose from, and I can shoot them at just about any time of day. I'm always looking for new varieties, and add a few to my collection each spring.
Here are a few images I've taken over the summer. The good news for me is that I still have callas blooming, so I'm not finished yet!


Happy shooting!
Kathleen Clemons
Tuesday, September 4, 2007
Some new ideas...
Hi all!!! Well, the ole' brain's been working on overtime lately and I have a bunch of new ideas. I also picked up a sound trigger that allows me to do some funky things. It hooks up to the camera and when the attached microphone here's a noise it trips the shutter. Here's a few examples...


Also, on the standard still front I found these amazing glass syringes that I've been searching for. I've had this idea for an image for ages but needed the right hypo's to work well... They backlight so well...

And to show that my photography isn't one sided, I went to Hawaii on a shoot recently and clicked this one...

Well, that's what I've been up to. Hope you enjoy lookin' as much as I enjoyed clickin'...
Dave


Also, on the standard still front I found these amazing glass syringes that I've been searching for. I've had this idea for an image for ages but needed the right hypo's to work well... They backlight so well...

And to show that my photography isn't one sided, I went to Hawaii on a shoot recently and clicked this one...

Well, that's what I've been up to. Hope you enjoy lookin' as much as I enjoyed clickin'...
Dave
Friday, August 31, 2007
Photopaintings: A Collection of Handpainted Photographs-Cheryl Machat Dorskind
I have spent the last few weeks preparing for a gallery exhibition,“Photopaintings: A Collection of Handpainted Photographs.” There are 30 images in the show. The reception for my exhibit is Friday and I am looking forward to a lively event.
For those who do not know me, I am a fine-art photographer known for my handpainted photographs and personal approach to children’s portraiture. I have written two books, The Art of Photographing Children, and The Art of Handpainting Photographs. For more biographic information, please visit my web site at www.cherylmachatdorskind.com.
I have been exhibiting my Photopaintings for over eighteen years. I will attach a few pictures of my fine art. Each photograph is printed the traditional darkroom (wet) enlargement method. The prints are custom hand printed onto fiber photographic paper and then enhanced with layers of oil paints.
This week also kicks off the third year of my newspaper column, “Picture This,” for The Southampton Press.
I teach Painting Photographs at PPSOP and will be teaching a two day intensive in Westhampton Beach, New York this fall (September 16-18). I also teach Photographing Children at PPSOP, another passion of mine. I hope some of you will join me.
Best regards,
Cheryl Machat Dorskind


For those who do not know me, I am a fine-art photographer known for my handpainted photographs and personal approach to children’s portraiture. I have written two books, The Art of Photographing Children, and The Art of Handpainting Photographs. For more biographic information, please visit my web site at www.cherylmachatdorskind.com.
I have been exhibiting my Photopaintings for over eighteen years. I will attach a few pictures of my fine art. Each photograph is printed the traditional darkroom (wet) enlargement method. The prints are custom hand printed onto fiber photographic paper and then enhanced with layers of oil paints.
This week also kicks off the third year of my newspaper column, “Picture This,” for The Southampton Press.
I teach Painting Photographs at PPSOP and will be teaching a two day intensive in Westhampton Beach, New York this fall (September 16-18). I also teach Photographing Children at PPSOP, another passion of mine. I hope some of you will join me.
Best regards,
Cheryl Machat Dorskind


Prague and Chicago
Last month I was in Prague doing a workshop and in early June I was in Chicago doing a workshop. Workshops have always been and will always be "surprise parties" as far as I am concerned at least the workshops I teach, since I honestly have little idea of what to expect and often times an even smaller idea of what we as a class will be shooting over the course of the workshop. This approach may seem a bit "unprofessional" but I know most if not all of my students have benefitted immensely from 'impulse' versus an orchestrated and planned shoot. Case in point was upon showing up in Prague, we learned of both the Kayaking Championships and the Prague Marathon. It was never my intention to shoot either prior to booking Prague as a workshop location, but as the students will tell you, both of these venues provided some welcomed and unexpected surprises photographically speaking. As we all lined the 'blue carpet' at the start of the race, (we arrived an hour before race time) we were all presented with the opportunity to shoot some great marathon photos. Casting some great shadows onto this carpet were other spectators behind us and to the sides and WOW what a GRAPHIC opportunity this presented and as the runners came through this scene, I was ready with my 12-24mm, cropping the feet of one group of runners whilst the 'long' shadows add a graphic element as well as lead the eye to the running feet.
It was several weeks later while in Chicago, that another group of students and myself were on a 'mission' to shoot some of the most interesting 'head shots' of the many people who were attending that day's Gospel Festival being held at Millineum Park.
I told each student to focus their attention soley on frame filling compositions that showed ONLY the back of a person's head.
Shorlty after suggesting this 'assignment', it started to rain HARD and the umbrellas came up quicker than the Crocus on a warm February day! Switching my attention to the crowd I back off with my 70-200mm and frist made an image of 'pattern' at 100mm as you see here but was also quick to adjust my exposure, (f/16 at a 1/4 second with the help of a 4-stop ND filter) and then I went to work on this same colorful and patternly scene choosing to ZOOM the lens during my 1/4 second exposure and voila, another worthy stock shot of "inclement weather". Enjoy!
Bryan Peterson


It was several weeks later while in Chicago, that another group of students and myself were on a 'mission' to shoot some of the most interesting 'head shots' of the many people who were attending that day's Gospel Festival being held at Millineum Park.
I told each student to focus their attention soley on frame filling compositions that showed ONLY the back of a person's head.
Shorlty after suggesting this 'assignment', it started to rain HARD and the umbrellas came up quicker than the Crocus on a warm February day! Switching my attention to the crowd I back off with my 70-200mm and frist made an image of 'pattern' at 100mm as you see here but was also quick to adjust my exposure, (f/16 at a 1/4 second with the help of a 4-stop ND filter) and then I went to work on this same colorful and patternly scene choosing to ZOOM the lens during my 1/4 second exposure and voila, another worthy stock shot of "inclement weather". Enjoy!
Bryan Peterson


Swallowtail
I had a great, unexpected photography experience a few weeks ago. I came out of the grocery store to find a beautiful swallowtail butterfly walking across the parking lot near my vehicle. I stood and admired it for a bit, noticing that it didn't seem to be able to fly. I put my hand down onto the ground and it climbed aboard so I decided to take it home with me. I put him down on the passenger seat and headed home. When we arrived (at this point I found him inside my purse, lol) I placed him in the shade on one of the irises in my iris garden. For the next day and a half I photographed him in the garden, watching for changes in the light, moving him to different flowers, using different lenses, angles and points of view, really working the situation. I knew this was a rare opportunity. Around mid-morning on the second day he was gone when I went out to the garden. I like to think that he gained the strength he needed during his visit with me to continue on his journey. I made over 350 images while he was here, I'll attach a few samples (all of these were made with the Lensbaby 2.0 and macro kit).
The moral of my story is to grab shooting opportunities when they appear and to really work them!
Kathleen


The moral of my story is to grab shooting opportunities when they appear and to really work them!
Kathleen


A wedding photographer in OZ!
I wanted to share with you a few images from my recent trip down under to Australia a couple of weeks ago. I am primarily a wedding photographer for the past 34 years, but am very passionate about photography period. It is my hobby as well as my work. I enjoy seeing images no matter what the subject. My longtime favorite is chasing the light down the road...This is Landscape photography to me. Exploring areas where I may have never been before, but led there by he light.
The first pair of images that I'd like to share with you were taken 3 weeks ago in Australia. I was chasing the light as it made the rolling hills landscape just jump at me with depth and dimension. I was amazed at its simple beauty. All that I needed (in my mind) to complete the composition was a foreground, an element to be able to stop your eye from wondering around the scene. I pulled up into a small driveway off of the main road and walked up to the fence. I was wrapped up in the beauty of the scenery when, as I put the camera up to my eye, my shoulder was nudged. I turned and looked behind me to the left and there was a goat that had climbed up on the fence and was looking at me from eye level. Hi Billi! I now had company. I said hello and excused myself to continue shooting. the result was the next frame posted here. After the images were captured, I stayed and talked with Billi (Goat) for a while before having to head down the road as the light was only getting better.
I hope that you might consider joining me for either my Wedding class here at PPSOP or my course on posing people.
Cheers,
Ken Sklute
Canon Explorer of Light
www.KenSklute.com


"You can't please everyone, so you've got to please yourself!"
The first pair of images that I'd like to share with you were taken 3 weeks ago in Australia. I was chasing the light as it made the rolling hills landscape just jump at me with depth and dimension. I was amazed at its simple beauty. All that I needed (in my mind) to complete the composition was a foreground, an element to be able to stop your eye from wondering around the scene. I pulled up into a small driveway off of the main road and walked up to the fence. I was wrapped up in the beauty of the scenery when, as I put the camera up to my eye, my shoulder was nudged. I turned and looked behind me to the left and there was a goat that had climbed up on the fence and was looking at me from eye level. Hi Billi! I now had company. I said hello and excused myself to continue shooting. the result was the next frame posted here. After the images were captured, I stayed and talked with Billi (Goat) for a while before having to head down the road as the light was only getting better.
I hope that you might consider joining me for either my Wedding class here at PPSOP or my course on posing people.
Cheers,
Ken Sklute
Canon Explorer of Light
www.KenSklute.com


"You can't please everyone, so you've got to please yourself!"
Subscribe to:
Posts (Atom)